Difference between revisions of "How to export download and view events"
Stagecoach (talk | contribs) m |
Stagecoach (talk | contribs) m (general spellchecking etc) |
||
| Line 1: | Line 1: | ||
=Prerequisites= | =Prerequisites= | ||
To export, download and view the events from | To export, download and view the events from Zone Minder there are 3 prerequisites. A note about this how to | ||
# Access to your | # Access to your Zone Minder website. | ||
# An application to | # An application to unpack the export files. | ||
#* For | #* For Linux most distribution include an application like unzip or untar. | ||
#* For Windows an excellent open source alternative to the default archive manager is [http://www.7-zip.org/download.html 7-Zip] | #* For Windows an excellent open source alternative to the default archive manager is [http://www.7-zip.org/download.html 7-Zip] | ||
=Export Methods= | =Export Methods= | ||
There are three ways to export events from | There are three ways to export events from Zone Minder, depending on the event you are looking for one of these methods is generally much faster at finding the content. In these examples we will extract all the events in the last hour from all cameras. | ||
==Front end interface method== | ==Front end interface method== | ||
This is the easiest way to view events if you want to check all events in the hour/day/week/month or all events for a certain particular camera. | This is the easiest way to view events if you want to check all events in the hour/day/week/month or all events for a certain particular camera. | ||
===Steps=== | ===Steps=== | ||
[[image:zm_home.png|right|thumb|caption|ZoneMinder homepage]] | [[image:zm_home.png|right|thumb|caption|ZoneMinder homepage]] | ||
# Login to | # Login to Zone Minder as a user who has export rights | ||
# From the home page you should see a table with columns labeling camera name events per hour/day/week/month/all. The very bottom column of this table totals the events | # From the home page you should see a table with columns labeling camera name events per hour/day/week/month/all. The very bottom column of this table totals the events across all cameras for the given hour/day etc. Click on the total events under the hour row to continue. | ||
[[image:eventsview.png|right|thumb|caption|Events view allows you to select which events to export]] | [[image:eventsview.png|right|thumb|caption|Events view allows you to select which events to export]] | ||
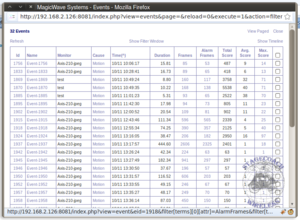
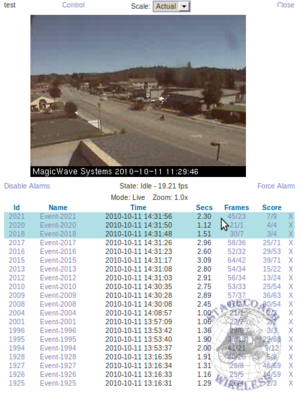
# You should now be on the event view page. This pages purpose is too list the events selected by your query method. From this view we are provided with many statistics about individual events. We may choose to review the events from this page by clicking on the name of the event, however for the purpose of this | # You should now be on the event view page. This pages purpose is too list the events selected by your query method. From this view we are provided with many statistics about individual events. We may choose to review the events from this page by clicking on the name of the event, however for the purpose of this how to we will simply choose to export all events by selecting the check-box in the top right cell. After selecting all the events from this view we open up the export dialog by clicking the EXPORT button located in the bottom right corner. | ||
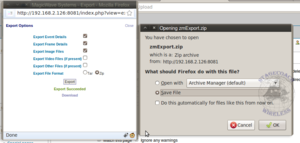
# This export options dialog that pops up allows us to select the file type that is exported. Before clicking the export button you must first make sure too check the following settings: | # This export options dialog that pops up allows us to select the file type that is exported. Before clicking the export button you must first make sure too check the following settings: | ||
##Export Event Details | ##Export Event Details | ||
| Line 20: | Line 20: | ||
##Export File Format: Zip | ##Export File Format: Zip | ||
[[image:zmexport.png|right|thumb|caption|Typical Export form settings]] | [[image:zmexport.png|right|thumb|caption|Typical Export form settings]] | ||
# Once you click the export button | # Once you click the export button Zone Minder will go through the process of packaging and formatting the events for you, this process can be quite intensive for the server if a large number of events are selected. When the process is completed a download link for a file called zmExport.zip should pop up, select save file and click ok. It is important to make a note of where you save your file as you will need to access it later. | ||
==Event Filter== | ==Event Filter== | ||
[[image:eventfilter.png|right|thumb|caption|Events Filter form]] | [[image:eventfilter.png|right|thumb|caption|Events Filter form]] | ||
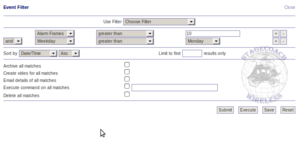
The filter method of exporting events gives the user the most detail and | The filter method of exporting events gives the user the most detail and control in the event query. As this method allows you to make very refined queries it does add some complexity to the process. To illustrate the power of this export method I will show you how Event Filter can create a custom query that is saved for future use, this custom query will select all events that have had more than 50 alarm frames on Mondays. | ||
===Steps=== | ===Steps=== | ||
# On the bottom left side of your Zone Minder homepage there should be a button | # On the bottom left side of your Zone Minder homepage there should be a button labeled "Filter" | ||
# The form section under the use filter select box is the area where we will define steps the event filter evaluates. To add the second step for the event filter simply click the + button on the bottom left of the | # The form section under the use filter select box is the area where we will define steps the event filter evaluates. To add the second step for the event filter simply click the + button on the bottom left of the field-set | ||
## The first filter should be ''Alarm Frames'' - ''greater than'' - 50 | ## The first filter should be ''Alarm Frames'' - ''greater than'' - 50 | ||
## Your second filter should be ''and'' - ''Weekday'' - ''equal to'' - '' | ## Your second filter should be ''and'' - ''Weekday'' - ''equal to'' - ''Monday'' | ||
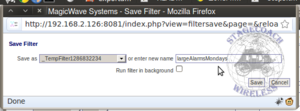
# To save this event filter method click on the save button. Make sure to write in a descriptive name for the filter. | # To save this event filter method click on the save button. Make sure to write in a descriptive name for the filter. | ||
[[image:alarmfiltersave.png|right|thumb|caption|Events Filter save form box]] | [[image:alarmfiltersave.png|right|thumb|caption|Events Filter save form box]] | ||
# Executing the event filter after you have saved it is as simple as clicking execute at the bottom of the page. | # Executing the event filter after you have saved it is as simple as clicking execute at the bottom of the page. | ||
# You should now be on the event view page. This pages purpose is too list the events selected by your query method. From this view we are provided with many statistics about individual events. We may choose to review the events from this page by clicking on the name of the event, however for the purpose of this | # You should now be on the event view page. This pages purpose is too list the events selected by your query method. From this view we are provided with many statistics about individual events. We may choose to review the events from this page by clicking on the name of the event, however for the purpose of this how to we will simply choose to export all events by selecting the check-box in the top right cell. After selecting all the events from this view we open up the export dialog by clicking the EXPORT button located in the bottom right corner. | ||
# This export options dialog that pops up allows us to select the file type that is exported. Before clicking the export button you must first make sure too check the following settings: | # This export options dialog that pops up allows us to select the file type that is exported. Before clicking the export button you must first make sure too check the following settings: | ||
##Export Event Details | ##Export Event Details | ||
##Export Frame Details | ##Export Frame Details | ||
##Export File Format: Zip | ##Export File Format: Zip | ||
# Once you click the export button | # Once you click the export button Zone Minder will go through the process of packaging and formatting the events for you, this process can be quite intensive for the server if a large number of events are selected. When the process is completed a download link for a file called zmExport.zip should pop up, select save file and click ok. It is important to make a note of where you save your file as you will need to access it later. | ||
==Individual camera export== | ==Individual camera export== | ||
[[image:individualview.png|right|thumb|caption|Individual camera view allows you to select specific events]] | [[image:individualview.png|right|thumb|caption|Individual camera view allows you to select specific events]] | ||
[[image:individualeventview.png|right|thumb|caption|From the individual event view exporting is as simple as clicking export (top left)]] | [[image:individualeventview.png|right|thumb|caption|From the individual event view exporting is as simple as clicking export (top left)]] | ||
This export Method is the | This export Method is the simplest way to check and export an individual event that has happened recently on a specific monitor | ||
===Steps=== | ===Steps=== | ||
# From your Zone Minder homepage open the [[individual view]] of a specific camera | # From your Zone Minder homepage open the [[individual view]] of a specific camera | ||
| Line 53: | Line 53: | ||
##Export Frame Details | ##Export Frame Details | ||
##Export File Format: Zip | ##Export File Format: Zip | ||
# Once you click the export button | # Once you click the export button Zone Minder will go through the process of packaging and formatting the events for you, this process can be quite intensive for the server if a large number of events are selected. When the process is completed a download link for a file called zmExport.zip should pop up, select save file and click ok. It is important to make a note of where you save your file as you will need to access it later. | ||
=Extracting Events= | =Extracting Events= | ||
A note about this section of the | A note about this section of the how to, For the examples i am using a custom export_functions.php plug-in that comes native in stagecoach wireless Zone Minder installs. | ||
Once you have selected your desired set of events you need a logical way to | Once you have selected your desired set of events you need a logical way to organize them and store them on your computer. My suggestion is too unzip all Zone Minder exports to a specific folder so you have them all in one place to easily browse and backup. | ||
==How to | ==How to unpack the export files== | ||
Most operating systems have many | Most operating systems have many different applications that allow you to extract zoneminder.zip packages. For this example i will show you one way to do this. | ||
===Linux=== | ===Linux=== | ||
[[image:archiveopen.png|right|thumb|caption|Ready to extract the events folder for viewing]] | [[image:archiveopen.png|right|thumb|caption|Ready to extract the events folder for viewing]] | ||
#Navigate to the folder where zmexport.zip was downloaded to. In this example i have 4 zmexport.zip files extracted to the folder | #Navigate to the folder where zmexport.zip was downloaded to. In this example i have 4 zmexport.zip files extracted to the folder | ||
#Double click opening up the archive manager | #Double click opening up the archive manager | ||
#Drag the events folder from the archive manager window into another folder. For ease of use i suggest you make a | #Drag the events folder from the archive manager window into another folder. For ease of use i suggest you make a separate folder to store all your ZM export events in. | ||
===Windows=== | ===Windows=== | ||
# Navigate to the folder where zmexport.zip was downloaded to. In this example i have 4 zmexport.zip files extracted to the folder | # Navigate to the folder where zmexport.zip was downloaded to. In this example i have 4 zmexport.zip files extracted to the folder | ||
# | # Right-clickk the filename and selectopen withth 7-zip, winrar or winzip. | ||
# When your archiving software is loaded up you should be able to select the events folder from | # When your archiving software is loaded up you should be able to select the events folder from zmexport.zip and drag it to your desired location in the file structure. | ||
=Viewing Extracted Events= | =Viewing Extracted Events= | ||
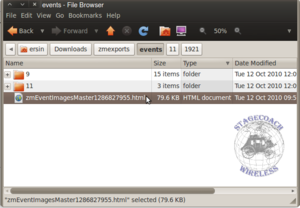
[[image:zmeventsmasterfile.png|right|thumb|caption|zmEventImagesMaster.html has a | [[image:zmeventsmasterfile.png|right|thumb|caption|zmEventImagesMaster.html has a time-stamp identifier so you can extract multiple events to one folder and still organize them by date]] | ||
To view the events you have just extracted simply browse to the ''events'' folder. To view the interface of all events open up the newest zmEventImagesMaster file in | To view the events you have just extracted simply browse to the ''events'' folder. To view the interface of all events open up the newest zmEventImagesMaster file in Fire Fox. | ||
From this page you get a tabbed view showing you events | From this page you get a tabbed view showing you events organized by monitor and chronological order. Within each events view you can display individual frames from the event or meta data about the event date/time/length | ||
<gallery> | <gallery> | ||
Image:zmeventmaster.png|Event viewer | Image:zmeventmaster.png|Event viewer | ||
| Line 79: | Line 79: | ||
Image:zmeventdetails.png|Event data view | Image:zmeventdetails.png|Event data view | ||
</gallery> | </gallery> | ||
==Events folder structure== | |||
*events | |||
**monitor-ids | |||
***event-ID | |||
****zmEventDetail.html (this is the file that contains meta data about an individual event) | |||
****zmEventFrames.html (this is the file containing a listed view of all event frames) | |||
****xxx-capture.jpg (individual snapshot from the event) | |||
**zmEventImagesMaster.html (this is the file that acts as the "home" page for each event extraction. you can extract multiple event sets to the events folder and acquire a list of these files | |||
Revision as of 19:53, 11 October 2010
Prerequisites
To export, download and view the events from Zone Minder there are 3 prerequisites. A note about this how to
- Access to your Zone Minder website.
- An application to unpack the export files.
- For Linux most distribution include an application like unzip or untar.
- For Windows an excellent open source alternative to the default archive manager is 7-Zip
Export Methods
There are three ways to export events from Zone Minder, depending on the event you are looking for one of these methods is generally much faster at finding the content. In these examples we will extract all the events in the last hour from all cameras.
Front end interface method
This is the easiest way to view events if you want to check all events in the hour/day/week/month or all events for a certain particular camera.
Steps
- Login to Zone Minder as a user who has export rights
- From the home page you should see a table with columns labeling camera name events per hour/day/week/month/all. The very bottom column of this table totals the events across all cameras for the given hour/day etc. Click on the total events under the hour row to continue.
- You should now be on the event view page. This pages purpose is too list the events selected by your query method. From this view we are provided with many statistics about individual events. We may choose to review the events from this page by clicking on the name of the event, however for the purpose of this how to we will simply choose to export all events by selecting the check-box in the top right cell. After selecting all the events from this view we open up the export dialog by clicking the EXPORT button located in the bottom right corner.
- This export options dialog that pops up allows us to select the file type that is exported. Before clicking the export button you must first make sure too check the following settings:
- Export Event Details
- Export Frame Details
- Export File Format: Zip
- Once you click the export button Zone Minder will go through the process of packaging and formatting the events for you, this process can be quite intensive for the server if a large number of events are selected. When the process is completed a download link for a file called zmExport.zip should pop up, select save file and click ok. It is important to make a note of where you save your file as you will need to access it later.
Event Filter
The filter method of exporting events gives the user the most detail and control in the event query. As this method allows you to make very refined queries it does add some complexity to the process. To illustrate the power of this export method I will show you how Event Filter can create a custom query that is saved for future use, this custom query will select all events that have had more than 50 alarm frames on Mondays.
Steps
- On the bottom left side of your Zone Minder homepage there should be a button labeled "Filter"
- The form section under the use filter select box is the area where we will define steps the event filter evaluates. To add the second step for the event filter simply click the + button on the bottom left of the field-set
- The first filter should be Alarm Frames - greater than - 50
- Your second filter should be and - Weekday - equal to - Monday
- To save this event filter method click on the save button. Make sure to write in a descriptive name for the filter.
- Executing the event filter after you have saved it is as simple as clicking execute at the bottom of the page.
- You should now be on the event view page. This pages purpose is too list the events selected by your query method. From this view we are provided with many statistics about individual events. We may choose to review the events from this page by clicking on the name of the event, however for the purpose of this how to we will simply choose to export all events by selecting the check-box in the top right cell. After selecting all the events from this view we open up the export dialog by clicking the EXPORT button located in the bottom right corner.
- This export options dialog that pops up allows us to select the file type that is exported. Before clicking the export button you must first make sure too check the following settings:
- Export Event Details
- Export Frame Details
- Export File Format: Zip
- Once you click the export button Zone Minder will go through the process of packaging and formatting the events for you, this process can be quite intensive for the server if a large number of events are selected. When the process is completed a download link for a file called zmExport.zip should pop up, select save file and click ok. It is important to make a note of where you save your file as you will need to access it later.
Individual camera export
This export Method is the simplest way to check and export an individual event that has happened recently on a specific monitor
Steps
- From your Zone Minder homepage open the individual view of a specific camera
- On the "watch" view of a monitor the recent events should be listed by date under the live stream. Click on an event from this list to view the individual event.
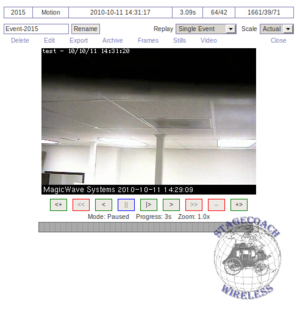
- On the individual event view page you should get a stream of the event. To export this event simply click the Export link located at the top of the page.
- This export options dialog that pops up allows us to select the file type that is exported. Before clicking the export button you must first make sure too check the following settings:
- Export Event Details
- Export Frame Details
- Export File Format: Zip
- Once you click the export button Zone Minder will go through the process of packaging and formatting the events for you, this process can be quite intensive for the server if a large number of events are selected. When the process is completed a download link for a file called zmExport.zip should pop up, select save file and click ok. It is important to make a note of where you save your file as you will need to access it later.
Extracting Events
A note about this section of the how to, For the examples i am using a custom export_functions.php plug-in that comes native in stagecoach wireless Zone Minder installs. Once you have selected your desired set of events you need a logical way to organize them and store them on your computer. My suggestion is too unzip all Zone Minder exports to a specific folder so you have them all in one place to easily browse and backup.
How to unpack the export files
Most operating systems have many different applications that allow you to extract zoneminder.zip packages. For this example i will show you one way to do this.
Linux
- Navigate to the folder where zmexport.zip was downloaded to. In this example i have 4 zmexport.zip files extracted to the folder
- Double click opening up the archive manager
- Drag the events folder from the archive manager window into another folder. For ease of use i suggest you make a separate folder to store all your ZM export events in.
Windows
- Navigate to the folder where zmexport.zip was downloaded to. In this example i have 4 zmexport.zip files extracted to the folder
- Right-clickk the filename and selectopen withth 7-zip, winrar or winzip.
- When your archiving software is loaded up you should be able to select the events folder from zmexport.zip and drag it to your desired location in the file structure.
Viewing Extracted Events
To view the events you have just extracted simply browse to the events folder. To view the interface of all events open up the newest zmEventImagesMaster file in Fire Fox. From this page you get a tabbed view showing you events organized by monitor and chronological order. Within each events view you can display individual frames from the event or meta data about the event date/time/length
Events folder structure
- events
- monitor-ids
- event-ID
- zmEventDetail.html (this is the file that contains meta data about an individual event)
- zmEventFrames.html (this is the file containing a listed view of all event frames)
- xxx-capture.jpg (individual snapshot from the event)
- event-ID
- zmEventImagesMaster.html (this is the file that acts as the "home" page for each event extraction. you can extract multiple event sets to the events folder and acquire a list of these files
- monitor-ids

